In this post I want to introduce you to the security features already built into Kubernetes that we sometimes forget to use, only to go looking for the same capability in external tools.

Namespace
Yes, that's right! Namespace plays an important role in management and security, especially when deploying applications and services on a large cluster. Namespace helps create independent spaces to separate resources (like Pod, Service, ConfigMap, Secret) and control access. Namespaces in Kubernetes are used as a foundation for applying other security measures.
In practice, namespaces can be used to:
- Separate application deployment environments like dev, staging, and production.
- Serve as a foundation for applying security measures like ResourceQuota (controlling resource usage), RBAC (role-based access), NetworkPolicy (network-based access control).
- Separate application config (ConfigMaps, Secret) across different environments.
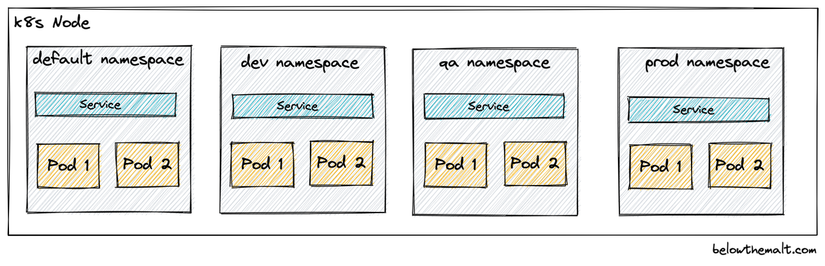
If you don't use a namespace to isolate environments or applications in the Kubernetes cluster, and instead deploy everything into the same namespace, applying security measures afterward becomes very difficult.
Network Policy
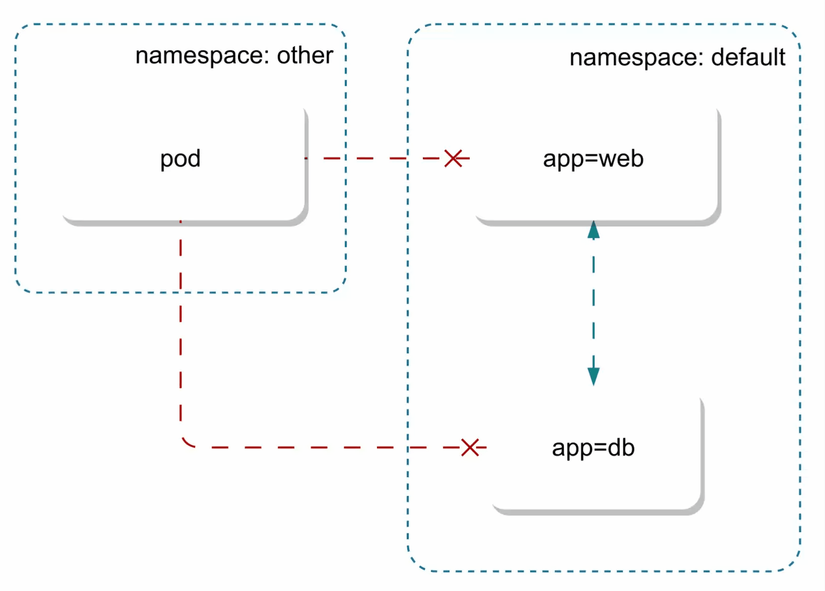
NetworkPolicy is a security tool in Kubernetes that manages and controls network traffic between Pods and with external services. By default, Kubernetes allows all Pods in the same cluster to communicate with each other with no restrictions at all. However, NetworkPolicy lets you create rules to specify exactly which network connections are allowed and reject unwanted ones, on both incoming and outgoing traffic.
Basically, NetworkPolicy helps protect against internal attacks, strengthens isolation between networks/applications, or protects sensitive data/services running in the Kubernetes cluster. In practice, NetworkPolicy is used to:
- Restrict network traffic to only within the application: Many applications deployed in K8s only need internal communication, with no traffic needed to the outside — you can use NetworkPolicy to restrict traffic to only come from Pods in the same Namespace.
- Block traffic from compromised Pods: An application can get attacked at one Pod, and a hacker might try to move laterally to infiltrate other Pods. Using NetworkPolicy helps prevent unnecessary network traffic between Pods, limiting the attack from spreading.
- Restrict access from staging to production: In a Kubernetes cluster, staging and production environments may exist in different Namespaces. NetworkPolicy can be used to prevent Pods in staging from communicating with Pods in production, ensuring environment isolation.
- Only allow traffic from approved services: A database should only be accessible by certain services (e.g. an API server) — NetworkPolicy can be configured to only allow network traffic from specific Pods, protecting sensitive data.
Here's an example manifest file for a NetworkPolicy allowing a pod with label app=backend to connect to a pod with label app=database
apiVersion: networking.k8s.io/v1
kind: NetworkPolicy
metadata:
  name: allow-frontend-access
  namespace: default
spec:
  podSelector:
    matchLabels:
      app: database
  policyTypes:
  - Ingress
  ingress:
  - from:
    - podSelector:
        matchLabels:
          app: backend
Role-Based Access Control (RBAC)
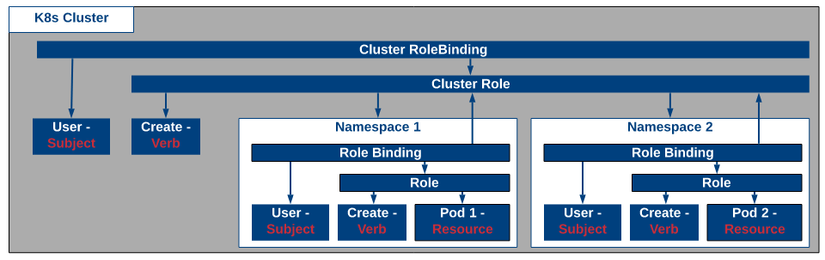
Role-Based Access Control (RBAC) in Kubernetes is one of the important mechanisms for managing and controlling access to resources in the cluster. It plays an essential security role by clearly defining who can perform what action on which resource. RBAC provides detailed permission granularity, protecting the Kubernetes cluster from unauthorized or unwanted activity.
The main components of RBAC in Kubernetes
RBAC is built on a few key components that determine access:
- Subjects: These are the entities that can request access to resources in Kubernetes, including:
- Users: Individual people or entities.
- Service Accounts: Used by applications or services running inside the cluster.
- Groups: A set of users grouped together to apply a shared policy.
- Roles: Roles define a set of permissions over a specific scope of resources.
- Role: Applies within the scope of a Namespace.
- ClusterRole: Applies across the entire cluster, not limited by Namespace.
- RoleBindings and ClusterRoleBindings: objects used to link a Role or ClusterRole to a Subject (a user, service account, or group).
- RoleBinding: Links a Role to a subject within a specific Namespace.
- ClusterRoleBinding: Links a ClusterRole to a subject across the entire cluster.
How RBAC works
When an API request gets sent to Kubernetes (e.g. creating, deleting, or accessing a resource), the RBAC system checks that request to determine whether the user has permission to perform that action on that resource. This ensures only authorized people or services can perform actions on resources.
Use cases
In practice, RBAC gets applied in many cases:
- Access control: RBAC lets admins define specific access permissions per resource. This helps prevent granting too much permission to a user or service, reducing security risk.
- Permissions by group or project: In a large Kubernetes cluster with many different dev teams or projects, RBAC can be used to grant permissions based on group or project. This separates access between groups and ensures each group only has access to its own resources.
- Protecting sensitive resources: With RBAC, sensitive resources like Secrets, ConfigMaps, or system resources (e.g. Nodes, PersistentVolumes) can be protected from unauthorized operations. Only people with specific permission can access or edit these resources.
- Applying the "least privilege" principle: RBAC helps implement the least-privilege security principle, meaning only granting the minimum permission necessary for a user or service to do their job. Applying this principle correctly reduces security risks tied to having too much unnecessary permission.
Pod Security Standard (PSS)
Pod Security Standards (PSS) in Kubernetes is a security feature that defines and enforces security standards for deploying Pods. PSS controls the use of sensitive features in a container, like root privileges, privileged networking, and mounting the filesystem. PSS's main goal is to protect the Kubernetes cluster from unsafe behavior by deployed Pods or applications.
PSS provides 3 different security levels: Privileged, Baseline, Restricted, configured per namespace.
- Privileged: This mode provides the lowest level of security, allowing a Pod maximum access to system resources. Used in cases requiring privileged access to the system, like some administrative tasks or Pods that control hardware.
- Baseline: A medium security mode, providing basic controls while still allowing some features needed for common applications. This mode doesn't allow privileged access. This level is for common applications that don't require privileged access but need some capabilities like networking or mounting volumes.
- Restricted: This is the highest security mode, maximally limiting access and prohibiting most sensitive behaviors like root privileges, privileged mode, special volume mounts, and the ability to change permissions. Applied to applications that need a high level of security and don't require access to privileged resources or hardware.
Read more about the permissions of each Level here: kubernetes.io
If you're not sure which level fits your application, you can start at the Privileged level and gradually adjust the config to raise the level to Restricted once the application meets the requirements.
Use cases
- Protecting against insider attacks: If a Pod in the Kubernetes cluster gets attacked, PSS's security policies prevent that Pod from escalating privileges or interfering with the host system and other Pods. This helps prevent attacks from within.
- Ensuring application compliance: With different security standards (Privileged, Baseline, Restricted), admins can apply the security policy matching each environment's requirements, ensuring only policy-compliant applications get deployed in the cluster.
- Limiting damage from compromised Pods: PSS limits what a Pod can do in case it's breached, minimizing potential damage. A compromised Pod won't be able to access sensitive resources or perform high-privilege actions.
- Strengthening filesystem and kernel security: By preventing a Pod from mounting privileged volumes or accessing sensitive filesystems, PSS protects Kubernetes' kernel and filesystem from being compromised or altered by unsafe Pods.
- Detecting and preventing misconfigurations: If an application or Pod tries to use privileged permission that isn't allowed (per the security standards set), PSS will detect and block that deployment, preventing unsafe configurations.
To use PSS for a namespace, add this label to the namespace:
# The per-mode level label indicates which policy level to apply for the mode.
#
# MODE must be one of `enforce`, `audit`, or `warn`.
# LEVEL must be one of `privileged`, `baseline`, or `restricted`.
pod-security.kubernetes.io/<MODE>: <LEVEL>

# Optional: per-mode version label that can be used to pin the policy to the
# version that shipped with a given Kubernetes minor version (for example v1.31).
#
# MODE must be one of `enforce`, `audit`, or `warn`.
# VERSION must be a valid Kubernetes minor version, or `latest`.
pod-security.kubernetes.io/<MODE>-version: <VERSION>
Security Context
Somewhat similar to Pod Security Standard (PSS), but Security Context focuses on a specific pod or container. Security Context lets admins and users control how Pods or Containers interact with the filesystem, user accounts, and system capabilities. Configuring Security Context matters a lot for protecting the application and Kubernetes cluster from security threats.
Security Context is commonly used to:
- Run a container without root privileges: A web application running on Kubernetes can be configured to always run under a non-root user account, reducing the risk of privilege escalation attacks.
- Limit a container's system capabilities: A container that uses some special system commands (like changing network config) can be granted a specific capability through Security Context without granting full root privilege.
- Mount a read-only filesystem: An application that only needs to read config data and doesn't need to write data can use
readOnlyRootFilesystem: trueto protect the filesystem from being altered by an attacker.
Here's an example using Security Context in Kubernetes:
apiVersion: v1
kind: Pod
metadata:
  name: secure-pod
spec:
  securityContext:
    runAsUser: 1000
    runAsGroup: 3000
    fsGroup: 2000
    allowPrivilegeEscalation: false
    seLinuxOptions:
      level: "s0:c123,c456"
  containers:
  - name: my-container
    image: nginx
    securityContext:
      capabilities:
        drop:
        - NET_ADMIN
        - SYS_TIME
      readOnlyRootFilesystem: true
      runAsNonRoot: true
securityContext at the Pod level:
- runAsUser: 1000: All containers in the Pod will run under the user account with ID 1000, not root.
- runAsGroup: 3000: Containers will run with group 3000's permissions.
- fsGroup: 2000: All filesystems mounted by the Pod will belong to group 2000.
- allowPrivilegeEscalation: false: Prevents containers in the Pod from being able to escalate privileges.
- seLinuxOptions: Configures the SELinux policy, at security level s0:c123,c456.
securityContext at the container level:
- capabilities.drop: Drops the NET_ADMIN and SYS_TIME system capabilities, preventing the container from interfering with network settings and system time.
- readOnlyRootFilesystem: true: The container's root filesystem will be read-only, preventing overwriting or altering system files.
- runAsNonRoot: true: Ensures the container won't be run with root privilege.
Wrapping up
So in this post I've walked you through a few native Kubernetes features related to Security. When working on Security, we always have to weigh 3 factors: Security level - Cost - Convenience — if one factor goes up, it pulls the others down. We won't need to apply every single feature above; you'll need to figure out what's just enough to apply to your own system.
This post might still be missing other security features available in Kubernetes. If you know of more, feel free to share below 🖖 If you found this post useful, please Upvote and Follow me to catch more posts related to DevOps, SRE, etc.! In the next post I might share more about security tools that can be integrated further into Kubernetes from the CNCF ✌️
If you're running into technical challenges or need help with systems, DevOps tools, I'm confident I can help. Get in touch at hoangviet.io.vn