Not configuring probes at all, or configuring them poorly, can cause downtime during an application update, disrupt request handling, or cause timeouts when requests get sent to pods that aren't ready yet...
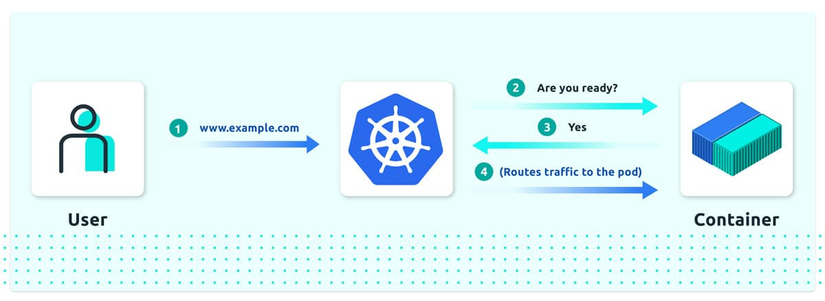
As an SRE (Server Reboot Engineer 😄), letting the above happen to a service I manage would genuinely be a disaster and simply unacceptable. Back when I was first getting familiar with deploying services on Kubernetes, I went through configuring Probes and the healthcheck API logic incorrectly, so any time there was an event like deploying a new version, scaling, draining nodes, etc., some error would somehow pop up somewhere. The errors weren't big enough at the time to justify the effort of digging in and fixing the root cause, but they happened fairly often and quietly became an invisible pain that cost quite a bit of effort to debug every time. So configuring probes correctly right from the start when deploying a service can make life a lot easier!
Before we start
This post goes deep into configuring K8s probes sensibly and what logic the healthcheck APIs behind them need to implement, so you'll need to already know a bit of the following:
- You already understand how to configure a basic service on K8s
- You understand the basic role of probes in K8s. If you don't know this part yet, you can read more in this post: Kubernetes best practices: Liveness and Readiness health checks
Types of probes in Kubernetes
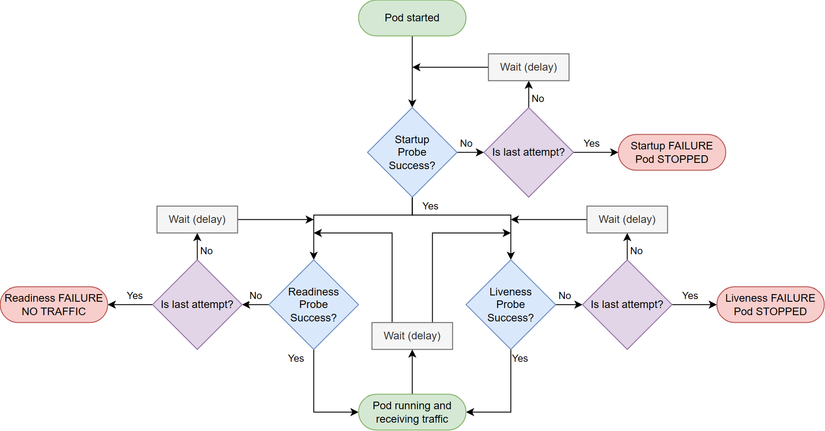
As of version 1.29, Kubernetes has 3 types of Probe: Liveness, Readiness, and Startup. We'll go through each Probe type one by one and how to configure each one. The image below shows how all 3 probes work in Kubernetes; I'll note the details and things to watch for with each probe as we go.
Startup Probe
First up is the StartupProbe, and as its name suggests, this is the one that runs first among the 3 probes right after a pod gets created. Only once the startupProbe succeeds can the Readiness and Liveness Probes start running.
Startup probe usually doesn't need to be defined; this probe is generally used to delay the point at which the pod starts receiving traffic, for cases where an application needs a long time to become ready, like some Java applications, etc. This approach lets you avoid using the initialDelaySeconds field in readiness or liveness to delay the pod's readiness check.
A Startup Probe config looks like:
startupProbe:
  httpGet:
    path: /healthz
    port: 5000
  failureThreshold: 30
  periodSeconds: 10
The config above gives the pod a maximum time of failureThreshold * periodSeconds = 300 seconds before the pod gets marked as unable to start. If after 300s K8s doesn't get a successful status code from path /healthz, the Pod will get killed. Within that maximum 300-second window, as soon as K8s gets a response from /healthz with a successful status code, the pod moves to the next stage to check Readiness and Liveness.
For this /healthz API, the logic behind it can simply return 200 to confirm the application has started up successfully, since user traffic still isn't sent to the pod yet after passing this probe.
Readiness Probe
Readiness probe is used to determine whether a pod is ready to receive traffic. If Kubernetes determines the pod is ready to handle traffic, the pod gets added to the service's endpoint.
Without a Readiness config, as soon as the container starts successfully and the Pod moves to the Running state, the pod's IP gets added to the service's Endpoint and traffic will be sent straight to that pod. In cases where the pod isn't actually ready to handle traffic (due to slow startup, a third party not yet connected successfully, the database being down, etc.), requests sent to it will time out, go unhandled, or get handled slowly. This is why I consider Readiness the most important probe — it should always be present, and its parameters should be carefully tuned to fit each specific service.
A Readiness Probe config looks like:
readinessProbe:
  httpGet:
    path: /readyz
    port: 5000
  initialDelaySeconds: 20
  periodSeconds: 15
  failureThreshold: 3
As a DevOps or SR Engineer, we sometimes only care about the system-side configuration parameters without paying attention to what the healthcheck APIs' code logic actually needs to do. I've seen plenty of cases where a dev just returns 200 for every single healthcheck API — if that's the case, running these probes doesn't mean much. As mentioned above, the Readiness probe is used to determine whether a pod is ready to receive traffic — and to be ready to handle traffic, the pod needs to be able to handle its functions normally, in other words, the pod needs to be able to connect to related systems and handle requests.
Example: if the Database dies, but the app still returns 200 as usual because that's hardcoded, K8s will believe the application is still running fine and keep sending traffic in steadily. That's not right!
So what logic should the API used for Readiness actually have? In my view, this API needs the following logic:
- Check the connection to the database (connect successfully, run a simple query)
- Check the connection to required third-party systems (e.g. if a service related to payments uses a third-party API, it should check the connection to that third party)
- Check the connection to the cache system
- And plenty more, depending on your application...
Notes:
- The query run against the DB should be simple, not consume much processing power, and this query should be independent (not tied to application data)
- In some cases, if the cache system dies but your application can still serve data from the DB (or vice versa), you shouldn't add logic checking the connection to the cache system. Configuring a check for both is like shooting yourself in the foot. 😅
Liveness Probe
Liveness Probe serves to determine whether a pod is alive or dead, and from there decide whether to restart the pod. In some cases a pod gets stuck or falls into a deadlock — the pod's state is still Running but it can no longer serve requests. The Liveness Probe steps in at this point to restart the container based on the Policy defined in the Pod's restartPolicy.
Read more about
restartPolicyhere!
Configuring Liveness is similar to the other probes:
livenessProbe:
  httpGet:
    path: /healthz
    port: 5000
  initialDelaySeconds: 15
  periodSeconds: 10
  failureThreshold: 3
The logic for the API used for Liveness just needs to return 200, since the point of the Liveness Probe is to check whether the container is still alive and can still respond to a request.
Common Practices
So we've gone over all 3 Probes, their purpose, and the things to watch for when using them. So the most important part: in practice, how are these probes actually used?
Since Startup Probe isn't mandatory and only gets used for applications that take a long time to start, I won't cover it in this section.
1. Using 2 different APIs for liveness and readiness
I think it's best to use 2 different APIs — /readyz for Readiness and /healthz for Liveness — to check. The config would look like:
livenessProbe:
  httpGet:
    path: /healthz
    port: 5000
  initialDelaySeconds: 15
  periodSeconds: 10
  failureThreshold: 3
readinessProbe:
  httpGet:
    path: /readyz
    port: 5000
  initialDelaySeconds: 30
  periodSeconds: 15
  failureThreshold: 3
A few notes:
- If you're not using a StartupProbe, you should configure
initialDelaySecondsat around 30 seconds to make sure the application finishes its startup process and avoid sending traffic during a resource peak while it's starting up. periodSeconds, the check interval, should be chosen sensibly (10-15 seconds) so it doesn't put pressure on the service's infrastructure.failureThresholdshouldn't be set too high
2. Using the same API for both liveness and readiness
The config when using the same API for both liveness and readiness looks like this:
livenessProbe:
  httpGet:
    path: /healthcheck
    port: 5000
  periodSeconds: 10
  failureThreshold: 5
readinessProbe:
  httpGet:
    path: /healthcheck
    port: 5000
  initialDelaySeconds: 30
  periodSeconds: 10
  failureThreshold: 3
When using the same API, liveness's failureThreshold should be higher than readiness's, so that if an incident happens, readiness fails first and K8s cuts off user traffic to the pods having an issue. If things get worse and the service can't recover on its own, liveness will keep failing and K8s will proceed to restart the container.
Wrapping up
The above is what I've distilled from my own work experience — it certainly can't avoid some mistakes or things that aren't quite right. If you spot a mistake or want to discuss further, feel free to comment below. Hope this post gives you some more ideas for your own work. Wishing you success! ❤️
If you found this post good and useful, please Upvote and Follow me to catch more posts like this. Thank you all!
If you're running into technical challenges or need help with systems, DevOps tools, I'm confident I can help. Get in touch at hoangviet.io.vn