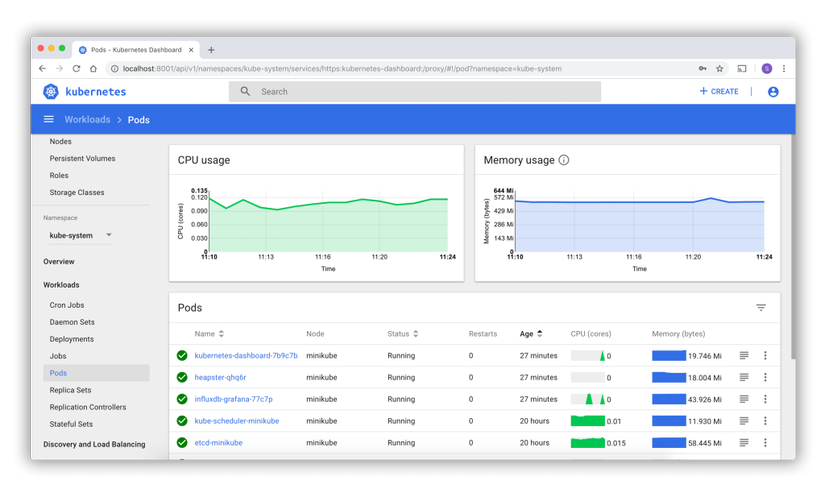
Why do we need to manage resources in Kubernetes?
In practice there are quite a few other factors we need to think about, since Kubernetes doesn't come with the ability to handle them by default. Managing resources effectively in Kubernetes helps us:
- Save on operating costs (Cost): This is probably the factor most people care about. Managing resources effectively can save a huge amount on cluster operating costs. I've seen many cases where you can optimize 30 to 70% of cost just by managing resources more effectively.
- Improve stability: When applications get sensible resource allocation, those resources run more stably.
In this post, I'll introduce the concepts that help you manage resources in Kubernetes, along with some of my own personal experience with each concept and tool.
Allocatable Resources (Node)
Allocatable Resources is info shown on each Kubernetes node. This figure shows how much resource you can actually use on each node. To view this info, run:
kubectl describe node <node-name>Example output looks like this:
Name:               node-pool-1
Roles:              <none>
Labels:             beta.kubernetes.io/arch=amd64
                    beta.kubernetes.io/os=linux
                    kubernetes.io/hostname=node-pool-1
                    node-role.kubernetes.io/worker=true
Annotations:        csi.volume.kubernetes.io/nodeid: {"ebs.csi.aws.com":"i-0a12345b67890cdef"}
                    volumes.kubernetes.io/controller-managed-attach-detach: true
CreationTimestamp:  Mon, 10 Aug 2024 10:45:23 +0700
Taints:             node.kubernetes.io/unreachable:NoSchedule
Unschedulable:      false
Lease:
  HolderIdentity:  node-pool-1
  AcquireTime:     Mon, 13 Oct 2024 10:45:35 +0700
  RenewTime:       Mon, 13 Oct 2024 11:00:35 +0700

Capacity: # <= The node's actual specs
  cpu:                4000mi
  ephemeral-storage:  100Gi
  hugepages-2Mi:      0
  memory:             16Gi
  pods:               110
Allocatable: # <= The amount of resource actually usable
  cpu:                3496mi
  ephemeral-storage:  95Gi
  hugepages-2Mi:      0
  memory:             15Gi
  pods:               110

System Info:
  Machine ID:                 1234567890abcdef
  System UUID:                98765432-1A2B-3C4D-5E6F-789012345678
  Boot ID:                    11223344-5566-7788-99AA-BBCCDDEEFF00
  Kernel Version:             5.11.0-1019-aws
  OS Image:                   Ubuntu 20.04.6 LTS
  Operating System:           linux
  Architecture:               amd64
  Container Runtime Version:  docker://20.10.8
  Kubelet Version:            v1.24.3
  Kube-Proxy Version:         v1.24.3

Conditions:
  Type             Status    LastHeartbeatTime                 LastTransitionTime                Reason             Message
  ----             ------    -----------------                 ------------------                ------             -------
  MemoryPressure   False     Mon, 13 Oct 2024 11:00:05 +0700    Mon, 10 Aug 2024 10:45:23 +0700   KubeletHasSufficientMemory   kubelet has sufficient memory available
  DiskPressure     False     Mon, 13 Oct 2024 11:00:05 +0700    Mon, 10 Aug 2024 10:45:23 +0700   KubeletHasNoDiskPressure     kubelet has no disk pressure
  PIDPressure      False     Mon, 13 Oct 2024 11:00:05 +0700    Mon, 10 Aug 2024 10:45:23 +0700   KubeletHasSufficientPID      kubelet has sufficient PID available
  Ready            True      Mon, 13 Oct 2024 11:00:05 +0700    Mon, 10 Aug 2024 10:45:23 +0700   KubeletReady                 kubelet is posting ready status

Addresses:
  InternalIP:  192.168.1.15
  Hostname:    node-pool-1

Non-terminated Pods:          (12 in total)
  Namespace                   Name                            CPU Requests  CPU Limits   Memory Requests  Memory Limits  AGE
  ---------                   ----                            ------------  ----------   ---------------  -------------  ---
  kube-system                 kube-proxy-abc123               100m (2%)     200m (5%)    64Mi (0%)        128Mi (0%)     45d
  kube-system                 coredns-12345abc                100m (2%)     100m (2%)    70Mi (0%)        70Mi (0%)      45d
  kube-system                 fluentd-abc123                  200m (5%)     200m (5%)    200Mi (1%)       400Mi (2%)     45d
  default                     nginx-deployment-abc123         500m (12%)    1 (25%)      512Mi (3%)       1Gi (6%)       10d

Allocated resources:
  (Total limits may be over 100 percent, i.e., overcommitted.)
  Resource           Requests     Limits
  --------           --------     ------
  cpu                1.6 (40%)    2.5 (62%)
  memory             846Mi (5%)   1.598Gi (10%)
  ephemeral-storage  0 (0%)       0 (0%)
  hugepages-2Mi      0 (0%)       0 (0%)

Events:
  Type    Reason                   Age                  From                     Message
  ----    ------                   ----                 ----                     -------
  Normal  NodeHasSufficientMemory   45d                  kubelet                  Node node-pool-1 status is now: NodeHasSufficientMemory
  Normal  NodeHasNoDiskPressure     45d                  kubelet                  Node node-pool-1 status is now: NodeHasNoDiskPressure
  Normal  NodeReady                 45d                  kubelet                  Node node-pool-1 status is now: NodeReady
Pay attention to the two sections Capacity and Allocatable.
Capacityshows the node's actual resources. For example, in the output above it's a node with 4 vCPU - 16 GB Memory - 100 GB Disk. This is the spec you requested from your cloud provider if you're on the cloud.- In practice, though, once you add a node with the above spec to a K8s cluster, you can't use 100% of these resources. The actual amount of resource available for running applications in K8s on this node is shown in
Allocatable. A lot of people mistakenly think that ordering a 4 vCPU node means they can use the entire resource, but in reality K8s reserves a portion to run system components like OS processes or K8s's own components. In this example, the usable resource is lower thanCapacity, at 3496mi CPU - 15GB Memory - 95GB Disk.
As far as I know, there's no fixed formula for computing
AllocatablefromCapacity— you'll have to check directly for each node type. That said, theAllocatable/Capacityratio tends to be larger on bigger-spec nodes, and smaller on smaller-spec nodes. So sometimes using a few large nodes gives you more usable resource than running many small nodes with the same total CPU/Memory spec!
Choosing the right node type for a Kubernetes cluster also matters a lot.
- If your cluster runs microservices whose pods use a small amount of resource, using many small-spec nodes is a good fit, since it's more convenient for node autoscaling and you can use up the entire resource on that node.
- If your cluster runs several different kinds of applications, like microservices + databases, you might approach it using multiple Node Pools for this cluster. Node pool 1 with a small spec running microservices, Node pool 2 with a higher spec running the database, since databases typically use a large amount of memory.
Resource Quota (namespace)
Resource Quota limits the total resources a namespace can use. This is very useful when you have multiple teams working in the same cluster and want to make sure no team hogs the entire resource pool. For example, in clusters used by multiple dev teams, you can assign each dev team a namespace and limit the amount of resource usable in each namespace via Resource Quota.
The manifest for a Resource Quota looks like this:
# resource-quota.yml file
apiVersion: v1
kind: ResourceQuota
metadata:
  name: dev-team-quota
spec:
  hard:
    pods: "10"
    requests.cpu: "4"
    requests.memory: "8Gi"
    limits.cpu: "8"
    limits.memory: "16Gi"
With the example above, every pod in the namespace must satisfy the conditions defined in the manifest file:
- The namespace can have at most 10 pods
- Total CPU request and limit in the namespace is 4 and 8
- Total Memory request and limit in the namespace is 8GB and 16GB
Run the following command to apply the Resource Quota:
kubectl apply -f resource-quota.yml --namespace dev-team-aResource request/limit
Resource request and limit are configurations set for a container inside a pod when deployed on Kubernetes. This config defines how resources get allocated to that container. A Resource request and limit config looks like this:
apiVersion: v1
kind: Pod
metadata:
  name: resource-example
spec:
  containers:
    - name: app
      image: busybox
      resources:
        requests:
          memory: "256Mi"
          cpu: "500m"
        limits:
          memory: "512Mi"
cpu: "1"- Resource Requests: The minimum resource a container requests. The scheduler uses this figure to determine whether a node has enough resource to run the pod.
- Resource Limits: The maximum resource a container is allowed to use. If a container exceeds this limit, it gets throttled (for CPU) or OOMKilled (for memory).
In the example above:
- The container requests at least 0.5 CPU and 256Mi Memory.
- The container may not use more than 1 CPU and 512Mi Memory. If it uses more than 512Mi Memory, Kubernetes will kill this container.
Configuring resource requests and limits is a fairly tricky balancing act between cost and performance, since setting the resource just a little too low can lead to the pod getting killed for using too much Memory.

Source: CAST AI
Before figuring out how to configure resource requests and limits appropriately, we first need to know about the Quality of Service concept in Kubernetes.
Quality of Service (QoS)
Quality of Service (QoS) helps Kubernetes prioritize resource allocation for pods based on their configured resource request and limit. Kubernetes classifies QoS into three groups: Guaranteed, Burstable, and Best-Effort. Basically, this is how we rank how important each pod is in Kubernetes. When a node runs out of resources, it will kill the lowest-priority pods first to push them onto other nodes, until the node's usage stabilizes, at which point it stops. In this case, you'll see the affected pods fall into the Evicted state.
So how do you define a pod's Quality of Service?
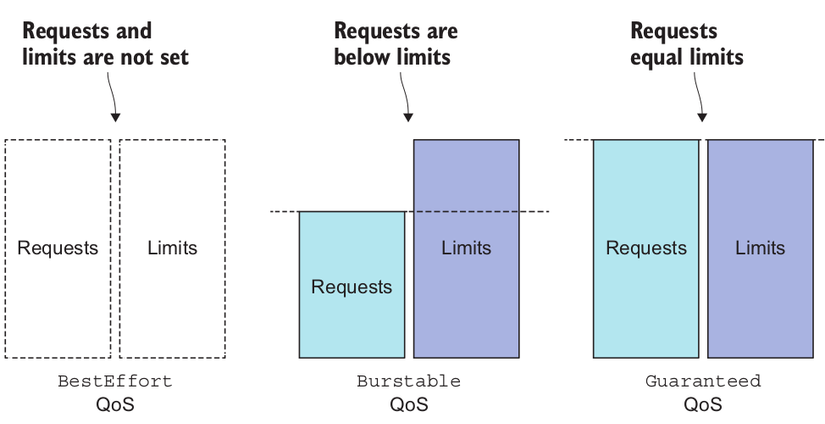
- Guaranteed: If both the CPU and memory request and limit are equal, the pod gets assigned QoS "Guaranteed". This is the highest priority level when the system runs short on resources.
- Burstable: If the request is lower than the limit, the pod belongs to the "Burstable" group, with medium priority.
- Best-Effort: If a pod doesn't configure a request or limit at all, it gets assigned QoS "Best-Effort", the lowest priority. This pod will be affected the most when resources become scarce.
Which kinds of applications should use which Quality of Service?
- In my experience, Stateful applications like databases, message queues, or critical applications like payments, etc. should be configured to use QoS Guaranteed. The resource level request = limit should be configured at the threshold matching the pod's highest usage over the past week, plus 10%.
Example: if a Redis pod used as a cache has the following memory usage thresholds over the past week: Min: 1.1 GB, Avg: 1.4 GB, Max: 1.9 GB, then I'd configure resource request = resource limit = 2.1 GB
- For QoS Burstable, I use this for Stateless applications with a high tolerance for failure (in simple terms, applications that still shut down gracefully when killed suddenly, without causing errors). Usually APIs, cron jobs, etc.
Example: a Python API pod has the following memory usage thresholds over the past week: Min: 300 MB, Avg: 350 MB, Max: 440 MB. I'd configure the memory request as 350 MB and the memory limit as 450MB
Configuring the memory request equal to the average resource usage helps ensure the pod gets enough resource to operate normally. The memory limit will be a bit higher than the max memory point to make sure that during peak hours the pod is also unlikely to get killed, keeping the system more stable.
- As for QoS Best-Effort, I prioritize this for pods providing secondary features to Kubernetes, like: Logging, Tracing, Monitoring, etc. Since when these pods get killed, the worst case is losing a few seconds of metrics, with no critical issue at all.
Wrapping up
In short, managing resources in Kubernetes is an important factor for ensuring applications run efficiently and don't affect other applications in the same cluster. By using Resource Requests and Limits, Resource Quotas, along with the QoS mechanism, you can tightly control how resources get used, thereby optimizing the system's performance and stability.
If you found this post useful and it brought you value, don't hesitate to give me an Upvote + a Follow. That's the motivation for me to share more knowledge about Kubernetes and DevOps.
Have a nice day!
If you're running into technical challenges or need help with systems, DevOps tools, I'm confident I can help. Get in touch at hoangviet.io.vn