But one fine day, the Master Node drops dead, Sentinel automatically switches Master to another node, and your code breaks with a flood of errors. Your boss yells at you, you're sad, you go online searching for a way to automatically detect the new Master node once the Failover process happens. This post will help you find a solution to that problem.
A quick recap of Redis Replication
Hopefully sometime soon I can write a detailed post about Redis Replication — for now here's a quick summary for anyone who doesn't know it yet. Redis Replication consists of Master and Slave nodes — the Master node handles read-write, the Slave node handles reading and backing up data from the Master. But this alone is pretty ordinary, so people came up with Redis-sentinel too, so that when the Master node goes down, Sentinel automatically finds a suitable Slave node (based on the replica-priority level).
That said, some argue the model above isn't optimal — a more optimal model would be having the Sentinel service split off into its own separate node, in case both the Redis and Sentinel service die together.
Getting into the main part
That's everything about Redis Replication you need to know to move to the next part. The model I'll walk you through in this post looks like the one above. We have a cluster of 2 HAProxy + KeepAlived nodes to find the Master Node in the Redis Replication. So why do we need 2 nodes??? Isn't 1 node enough to find it? True, 1 node is enough to find it, but since Redis has Failover, HAProxy also needs Failover — that's KeepAlived — to avoid a situation where the HAProxy node dies and takes the whole thing down with it. Here, VIP isn't a node but a Virtual IP created for Failover. Users or the Application will access the redis replication through the VIP.
Installing and configuring KeepAlived
In this post I use CentOS, so I install with yum — if you use Ubuntu, use apt, everything else is similar.
Install Keepalived with the command:
yum -y install keepalivedConfigure Keepalived on the Master node:
vrrp_script chk_haproxy {
    script "pkill -0 haproxy"
    interval 2
    weight 2
}
vrrp_instance VI_1 {
    interface eth0
    state MASTER
    virtual_router_id 51
    priority 101
    virtual_ipaddress {
        10.5.9.111
    }
    track_script {
        chk_haproxy
    }
}
Configure KeepAlived on the Slave node:
vrrp_script chk_haproxy {
    script "pkill -0 haproxy"
    interval 2
    weight 2
}
vrrp_instance VI_1 {
    interface eth0
    state BACKUP
    virtual_router_id 51
    priority 100
    virtual_ipaddress {
        10.5.9.111
    }
    track_script {
        chk_haproxy
    }
}
Explanation:
vrrp_script chk_haproxy is a script that checks whether the haproxy service is still alive — if the service dies, priority gets reduced and gets handed over to the BACKUP node
interface: the interface where we set up the Virtual IP (use the ifconfig command to check)
state [MASTER/BACKUP]: the node's state
virtual_router_id: this value must be the same across nodes
priority: the node's priority (higher becomes Master)
virtual_ipaddress: the VIP declaration section
track_script: declares the script above
Config to allow binding to the VIP address
echo 'net.ipv4.ip_nonlocal_bind = 1' >> /etc/sysctl.confInstalling and configuring HAProxy
Install HAProxy with the command:
yum -y install haproxyConfigure on both the Master and Backup nodes
global
    log         127.0.0.1 local2
    chroot      /var/lib/haproxy
    pidfile     /var/run/haproxy.pid
    maxconn     4000
    user        haproxy
    group       haproxy
    daemon
    stats socket /var/lib/haproxy/stats

defaults
    log                     global
    option                  redispatch
    retries                 3
    timeout http-request    10s
    timeout queue           1m
    timeout connect         10s
    timeout client          1m
    timeout server          1m
    timeout http-keep-alive 10s
    timeout check           10s
    maxconn                 3000

listen stats
    bind *:8080
    mode http
    stats enable
    stats uri /stats
    stats realm HAProxy\ Statistics
    stats admin if TRUE

listen redis_clusters
    bind *:6379
    mode tcp
    timeout connect  3h
    timeout server  3h
    timeout client  3h
    option tcp-check
    tcp-check connect                        # Used to connect to the back-end server
    tcp-check send AUTH\ vccloud1\r\n        # Add this line if Redis has a password
    tcp-check send PING\r\n                  # Check the connection
    tcp-check expect string +PONG            # Expect this return output
    tcp-check send info\ replication\r\n     # Get replication info
    tcp-check expect string role:master      # If it returns role master, confirm this is the master node
    tcp-check send QUIT\r\n                  # Exit the connection
    tcp-check expect string +OK              # Expect this return output (can be omitted)
    server redis-cluster-1 10.5.9.198:6379 check inter 1s
    server redis-cluster-2 10.5.9.105:6379 check inter 1s
    server redis-cluster-3 10.5.10.126:6379 check inter 1s
Explanation:
The global and defaults blocks contain global config, kept as-is.
The Listen stats block creates a status-monitoring page for nodes on port 8080, path /stats
The redis_clusters block
- bind *:6379; Allows access from any IP
- mode: the protocol used
- tcp-check: used to send tcp commands to the back-end server to find the master node
- server: declares the back-end Redis Cluster Servers
So we've finished installing and configuring KeepAlived + HAProxy — now let's start the services:
systemctl restart haproxy
systemctl restart keepalived
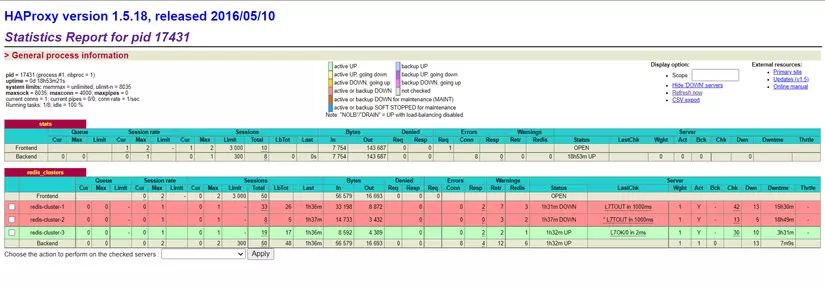
Visit IP_MASTER:8080/stats or IP_SLAVE:8080/stats — if you see stats like in the image, HAProxy is working (2 Slave nodes down - 1 Master node Up):
To test the VIP, you can use the command — seeing connected means success
telnet VIP 6379Wrapping up
This is the result of nearly a week of my own research, so there will certainly still be gaps or mistakes. Hope this post helps you out a little in your work — if you have any questions, comment below. To support me, feel free to Follow or Vote Up. See you in the next post.
If you're running into technical challenges or need help with systems, DevOps tools, I'm confident I can help. Get in touch at hoangviet.io.vn