Why do you need to upgrade GKE's version?
Here are a few reasons that explain why we need to update our Kubernetes cluster:
- Ensure the cluster's stability
- Experience and use new features
- Prevent security issues and vulnerabilities in older versions
- And finally, updating because the Cloud provider (Google) forces you to, or they'll stop supporting it. Every 3 months a version reaches end of support — you can check the EOL (End of Life) for GKE versions here: endoflife.date/google-kubernetes-engine
- And plenty of other reasons
In general, if you've worked or are working with GKE, chances are high you'll have to deal with updating the version of your running Kubernetes clusters. In this post I'll walk through a few ways to update a GKE cluster's version that I've picked up along the way.
Note: Google currently has 2 types of GKE: GKE Standard and GKE Autopilot. For GKE Autopilot, version upgrades happen completely automatically, so in this post I'll only talk about GKE Standard, for cases where you want to proactively update the version.
Minor upgrade
Minor upgrade is the process of updating or upgrading software or a system from the current version to a new one, where the change in the new version is usually small, or focused on bug fixes, performance improvements, and minor features.
Example: Upgrading from 1.23.2 to 1.24, or from 1.24 to 1.25
To do a minor upgrade you can use one of two ways: the web UI or the command line (CLI)
Using the web UI
Go into the cluster you want to upgrade — in the Details section, you'll see "Upgrade Available" text in the Cluster Basics section
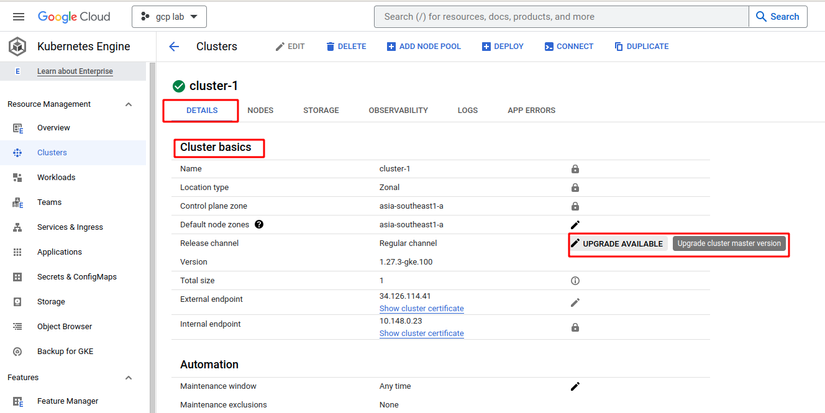
Choose the version you want to upgrade to and confirm.
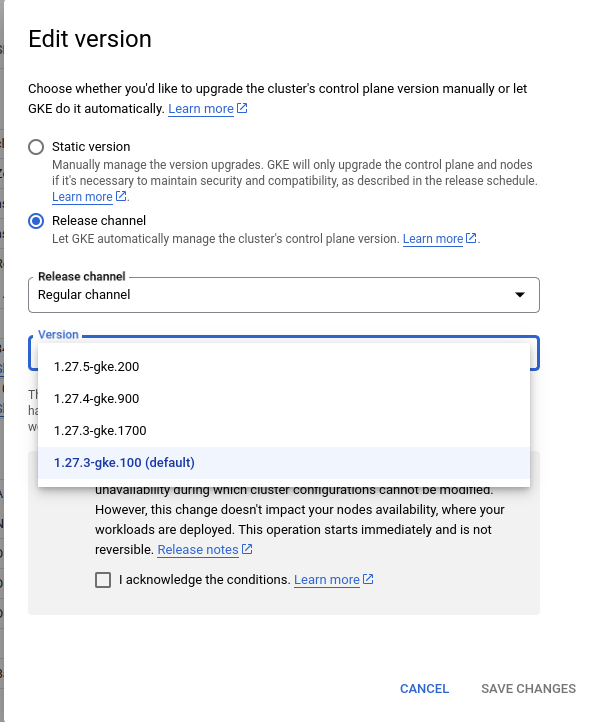
Google will update the Control Plane nodes first; a few minutes after the Control Plane nodes are done updating, the Worker Nodes will get updated automatically.
Pros
- Fairly hands-off, you don't need to do much
Using the command line
To use the command line you can use Cloud Shell in the browser directly, or a Terminal on your personal machine. Similar to how Google auto-updates the cluster, with this approach we'll have to manually update the Control plane nodes and Worker nodes ourselves.
To update the Control Plane nodes we use the following command, changing the values to fit your cluster:
gcloud container clusters upgrade cluster-1 --master --cluster-version 1.25.15-gke.1700 --region=asia-southeast1 --project lab-projectYou can use the following command to check the cluster's update status:
gcloud container operations list --project lab-project --region=asia-southeast1Next, once the Control Plane nodes have been updated, we'll continue updating the node-pool with the command
gcloud container clusters upgrade cluster-1 --node-pool=default-pool --cluster-version 1.25.15-gke.1700 --region=asia-southeast1 --project lab-projectMultiple Upgrade
I'm not sure if the name multiple upgrade is standard, so I'm using it as a temporary label.
Multiple upgrade in this post refers to "leapfrogging" the version upgrade. Unlike Minor upgrade, where I'd upgrade a cluster one version at a time — like version A to A+1 — Multiple Upgrade upgrades version A straight to A+3.
Example: Upgrading from version 1.24 to 1.27. I'll use this same example to describe the 2 update approaches below.
Approach 1
Briefly, I'd carry this out as follows:
- Continuously update the Control Plane nodes' version from 1.24 to 1.25, then 1.25 to 1.26.
- Deploy a new node-pool with version 1.26
- Gradually drain the nodes in the old node pool so resources move over to the new-version node pool.
- Delete the old node pool.
With this approach you can upgrade at most 2 versions at a time, due to Kubernetes' compatibility limits.
Example: you can go from a 1.24 cluster to 1.26, but not directly from 1.24 to 1.27. This approach saves a fair bit of time when updating the node pool if your cluster has many worker nodes.
Approach 2
If you're already familiar with the Blue-Green deployment strategy, this is exactly that strategy.
Instead of updating the current cluster's version, you'll create a brand new cluster with the desired version. Then switch routing over to this new cluster.
Briefly, the deployment steps would be:
- Create a new K8s cluster with the desired version, 1.27
- Deploy the services currently running in the old environment onto the new environment (keeping the old environment's resources intact)
- Verify the services work correctly on the new environment
- Redirect requests to the new cluster (usually by changing DNS records, Load balancer configs)
- Delete the old version 1.24 cluster
Pros
- No downtime
- You can upgrade as many versions as you want
Cons
- Preparing the new cluster will take a lot of time to test thoroughly
- Cost will be higher since you have to maintain 2 clusters for a period of time
A few more notes
- While upgrading a cluster's version, you need to check whether the ApiVersion of your resources is compatible with the new cluster version, since APIVersions can get removed in a new version.
- Your services running on the Cluster need a graceful shutdown mechanism to avoid and minimize the service's downtime.
Wrapping up
Thanks for reading all the way through — the above is based on what I've learned. If you know of a better approach, or spot a mistake in this post, please comment below to share. Have a nice day! 😁
If you're running into technical challenges or need help with systems, DevOps tools, I'm confident I can help. Get in touch at hoangviet.io.vn